![How to Shape Your Eyebrows [Beginner’s Guide]](https://ejqczs4xhji.exactdn.com/wp-content/uploads/2020/07/woman-in-red-hijab-3748399-edited.jpg?strip=all&lossy=1&ssl=1)
How to Shape Your Eyebrows [Beginner’s Guide]
5 easy steps to get perfect eyebrows at home.
You’ve probably seen plenty of tragic videos of people messing up their eyebrows before, laughing out loud at first before realising you really don’t want to be in their shoes, especially since we have to wear masks everywhere now. Tropika Club shares these easy tips on how to shape your eyebrows for all the beginners out there.
Table of Contents
No Time to Read? Here’s a Snappy Summary of This Article
- Find your natural brow shape: Use a pencil or a brush to align it with the inner corner of your eye and the edge of your nostril, then mark where your brow should start. Repeat for the other eye.
- Determine where your arch should be: Align the pencil or brush with the outer edge of your iris and the edge of your nostril, then mark where your brow should peak. Repeat for the other eye.
- Figure out where your brow should end: Align the pencil or brush with the outer corner of your eye and the edge of your nostril, then mark where your brow should taper off. Repeat for the other eye.
- Trim and tweeze your brows: Use a spoolie brush to comb your brows upward, then trim any hairs that extend beyond your natural brow line. Use a pair of tweezers to pluck any stray hairs below or above your brow, following your natural shape.
- Fill in any gaps or sparse areas: Use a brow pencil, powder, or pomade to fill in any gaps or sparse areas in your brows. Use short, light strokes to mimic natural hair growth. Blend well with a spoolie brush.
- Set your brows in place: Use a clear or tinted brow gel to set your brows in place and add some definition. Brush the gel through your brows in an upward and outward motion.
![How to Shape Your Eyebrows [Beginner’s Guide]](https://ejqczs4xhji.exactdn.com/wp-content/uploads/2020/07/woman-wearing-red-turtleneck-top-3220360-edited-1024x768.jpg?strip=all&lossy=1&ssl=1)
But first, grow them out
How do you get perfect eyebrows naturally? By growing it out! Only then you can see the natural arch on your eyebrows, though you need to let your eyebrows grow for around three to four months to see the change. It actually takes up to a year for your eyebrows to grow back entirely.
As you might expect, there’ll be stray hairs on your eyebrows. But the trick is to not tweeze it — trim it instead. Of course, you can tweeze the hairs are growing in between your eyebrows. The trick is to place your index between your eyebrows, then you draw a line on both sides of your finger with an eyeliner pencil. Though you might want to ease up on the inner corners, since the hairs there could be more difficult to grow back.
But then, maybe its time to bring back the Frida Kahlo look. After all, there’s no time like the present to tear down old beauty standards. Rihanna did it before, as did Spanish pop phenomenon Rosalía.
Patching Things Up
As you grow your eyebrows, there may be awkward patches here and there. But fear not! There are easy fixes for it.
If your eyebrows are still in good shape, you just need to use pencils and powder to fill in the holes. But that won’t cut it if you’re growing more than a few sparse patches. To cover up all the new growth patches, you can use a wax/powder combination, or a putty-like product. They tame stubborn hair, more forgiving, and you don’t have to be that precise with it.
If you’re colouring your eyebrows as they grow, fill up bald spots with short, angled strokes in the direction of how your hair grows. And let your bone structure create the arch, instead of using makeup. Otherwise, it’ll be super obvious, even with the right shade.
Read Also:
Time for some Brow-raising action:
Worried about how to shape eyebrows for the first time? There are just three things you need to remember:
where it starts,
where it arches,
and where it ends.
1. Find the Starting Point
It’s somewhat similar to the tip about tweezing the hairs in between your eyebrows. But this time, with a pencil or with tweezers, line the tool vertically from the outside from the nostril. Find the point where that tool intersects with your eyebrows and mark it with an eyeliner pencil. If there are hairs that go beyond that mark towards the centre between your eyebrows, you can tweeze them off.
You might want to take extra caution for the start of your eyebrows since it’ll determine the contours of your nose. Because the starting points between both sides of your eyebrows can make your nose look wider or narrower.
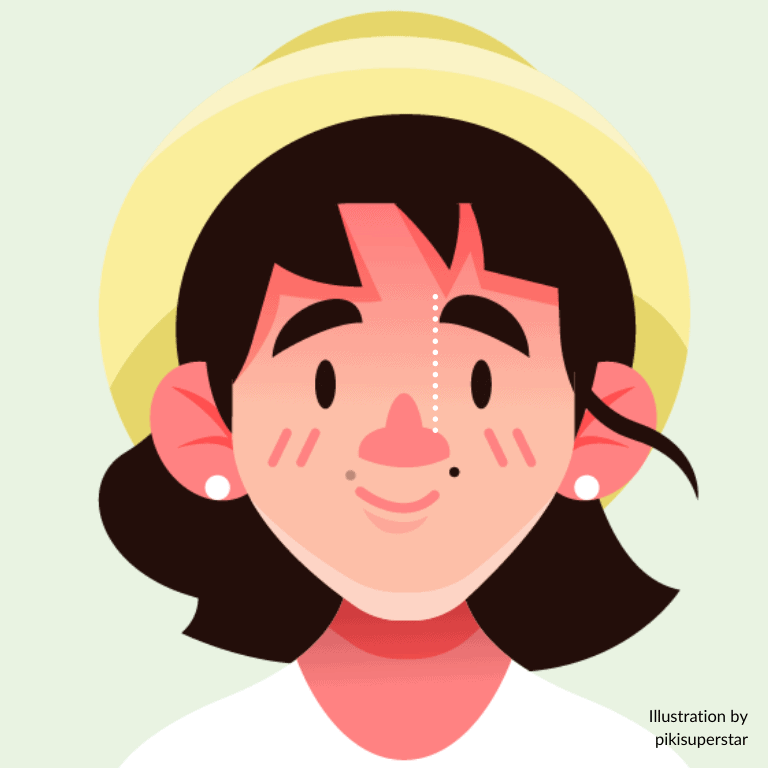
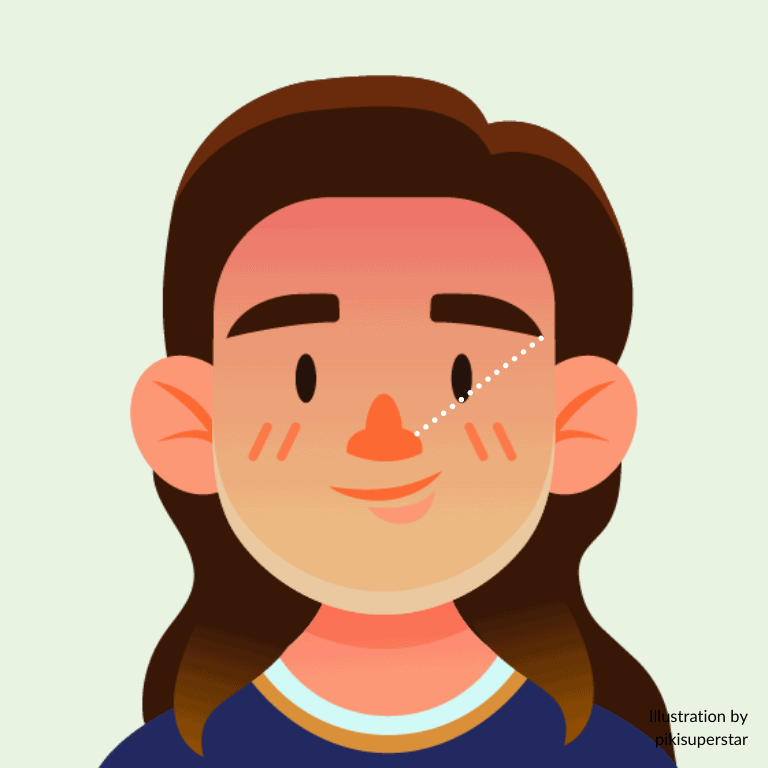
2. Mark the Arch
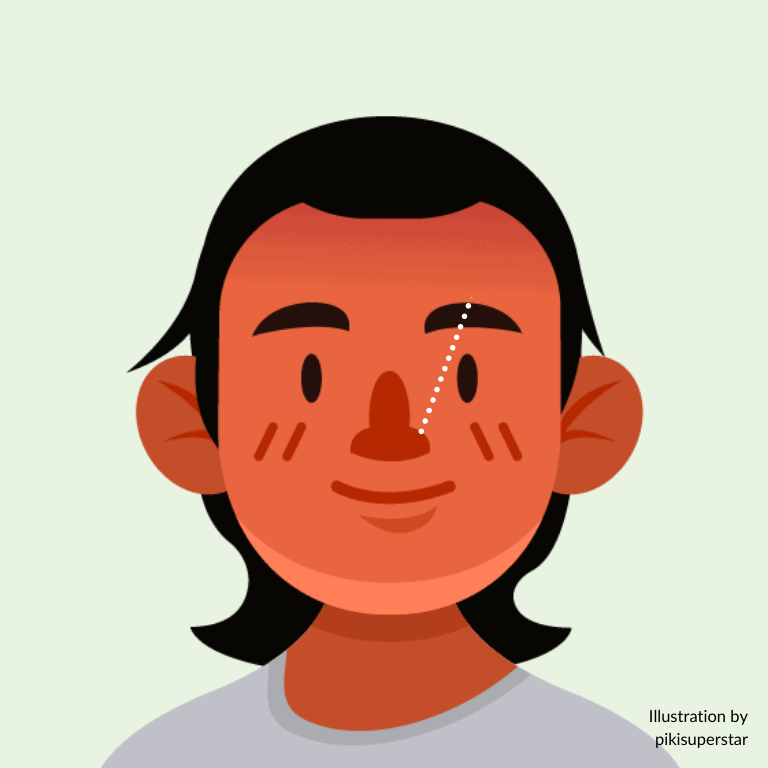
No, the arch is not on the dead centre of your eyebrows, unless you’re going with the avant-garde villain look. To find out where the arch on your eyebrow should be, measure from the outer edge of your nostril to the highest point of your eyebrow with the tool. You don’t need to tweeze yet, you only need to mark this point with an eyeliner pencil.
This line could be at any angle, and it doesn’t matter what’s the final shape of your eyebrows. You actually customise the shape of your arch by plucking underneath the peak of the arch. So we’d recommend you to keep your eyes open as you mark your arch.
3. Find The End Point
To mark the end of your eyebrows, start with measuring from the outside of your nostril again. Find a straight line from there to the outer corner of your eye. Then, mark the point where the line intersects your eyebrow.
Here are three general rules about eyebrows:
- Never end your brows too short, especially you have long, beautiful ones.
- Shorter eyebrows usually work better with smaller faces.
- Longer brows could make your eyes look smaller.
Read:
4. Connect the dots
Now, you just need to connect the three points together. Afterwards, you can opt for a precise pencil, or pomade with a brush, to fill in your eyebrows between the three points. Your eyebrow tends to get fine at the end, so make sure you taper off towards the end of your eyebrows.
The filled-in can be a great guide, but you might want to ease off on relying it. There could be some gaps you’ve missed out. A great tip is to feel the bone underneath your eyebrows to see if the drawn-in shape is aligned with the bone.

5. The final shape up
Once you’ve drawn your eyebrows, the hairs outside of the filled area can be removed. Pull your skin tight, and as you remove each hair, remove it according to the direction it’s growing. That way, you won’t damage or rupture the follicle.
If there are hairs that are too close to the line, it’s best to leave it, unless you have a professional to help. Otherwise, you might have to deal with a gap in your eyebrows.
Before you trim the hairs that seem to be too long, you’d have to know that the individual hairs help overlap each other, covering any gaps you may have. But if it’s too long for you anyway, then just trim it away.
To properly trim it, brush the hairs upwards, and snip away the portion of the hair that reaches above the area you’ve drawn your eyebrows. Do remember to use a pair of scissors with a straight, sharp blade, instead of those curved ones.
Conclusion
Shaping your eyebrows can make a big difference to your look. But if you’re new to it, it can be a bit intimidating. Don’t worry, we’re here to help you with some easy steps to get the perfect brows for your face shape.
First, you need to find your natural brow shape. This is the shape that suits your face best and enhances your features. To do this, you’ll need a pencil or a brush and a mirror. Hold the pencil or brush vertically against your face, and align it with the inner corner of your eye and the edge of your nostril. This is where your brow should start. Make a small mark with an eyeliner or a brow pencil. Do the same for the other eye.
Next, you need to determine where your arch should be. This is the highest point of your brow, where it curves slightly. To find it, hold the pencil or brush diagonally against your face, and align it with the outer edge of your iris (the colored part of your eye) and the edge of your nostril. This is where your brow should peak. Make another small mark. Do the same for the other eye.
Then, you need to figure out where your brow should end. This is where it tapers off and meets the outer corner of your eye. To find it, hold the pencil or brush diagonally against your face again, but this time align it with the outer corner of your eye and the edge of your nostril. This is where your brow should end. Make another small mark. Do the same for the other eye.
Now that you have marked your natural brow shape, you can trim and tweeze your brows. You’ll need a pair of scissors, a spoolie brush (a mascara-like wand), and a pair of tweezers. Use the spoolie brush to comb your brows upward, and trim any hairs that stick out beyond your natural brow line with the scissors. Be careful not to over-trim or cut too short. Then, use the tweezers to pluck any stray hairs below or above your brow, following your natural shape. Don’t pluck too much or too close to the marks you made. You want to keep some fullness and definition in your brows.
After trimming and tweezing, you can fill in any gaps or sparse areas in your brows. You can use a brow pencil, powder, or pomade for this step. Choose a color that matches or is slightly lighter than your natural brow color. Use short, light strokes to mimic natural hair growth and fill in any gaps or sparse areas in your brows. Blend well with the spoolie brush to create a natural look.
Finally, you can set your brows in place with a clear or tinted brow gel. This will help them stay put and add some definition and shine. Brush the gel through your brows in an upward and outward motion, following their natural direction.
And there you have it! You’ve just shaped your eyebrows like a pro! You can do this every few weeks or whenever you feel like they need some grooming. Remember to follow your natural shape and don’t overdo it. Your eyebrows are meant to frame and flatter your face, not overpower it.
We hope this guide was helpful for you and that you enjoyed reading it as much as we enjoyed writing it for you. If you have any questions or feedback, feel free to leave us a comment below or contact us through our website. We’d love to hear from you!
At Tropika Club Magazine, we are always on the lookout for the latest beauty trends and tips to share with our readers. We also offer great deals and discounts on beauty services and products from our trusted partners. So if you’re looking for more ways to pamper yourself and enhance your beauty, check out our website and subscribe to our newsletter today! You won’t regret it! 😉
Frequently Asked Questions (FAQ)
Q: What is brow embroidery and how is it different from brow shaping?
A: Brow embroidery is a semi-permanent makeup technique that involves creating hair-like strokes or shading on the brows with pigments. Brow shaping is a grooming service that involves trimming, tweezing, or waxing the brows to enhance their natural shape.
Q: How long does brow embroidery last and how often do I need to touch up?
A: Brow embroidery typically lasts between one to two years, depending on your skin type, lifestyle, and aftercare. You will need to touch up your brows after your first session, usually within one to three months. After that, you can touch up your brows every six to 12 months to maintain the color and shape.
Q: Where can I find the best brow embroidery salons in Singapore?
A: There are many brow embroidery salons in Singapore that offer different styles and techniques to suit your preferences and budget. Some of the best ones include Blush Official, Jo Artysan, Browhaus, Erabelle, and The Brow & Beauty Boutique. You can check out our Salon Finder for more details and exclusive deals on brow embroidery services.
Q: How do I prepare for my brow embroidery session and what should I expect?
A: Before your brow embroidery session, you should avoid any exfoliation, waxing, or threading on your brows for at least a week. You should also avoid alcohol, caffeine, aspirin, or blood thinners for 24 hours before your appointment. During your session, your brow technician will consult with you on your desired brow shape and color, and draw a template for your approval. Then, they will apply a numbing cream on your brows and start the embroidery process using a handheld tool or a machine. The session may take between one to two hours, depending on the technique and complexity of your brows.
Q: How do I take care of my brows after my brow embroidery session and what are the possible side effects?
A: After your brow embroidery session, you should follow the aftercare instructions given by your brow technician carefully. Some general tips include avoiding water contact, makeup, skincare products, sun exposure, swimming, sauna, or sweating on your brows for at least a week. You should also avoid scratching, picking, or rubbing your brows as they heal. You may experience some redness, swelling, itching, scabbing, or fading on your brows during the healing process. These are normal and should subside within a few weeks. However, if you notice any signs of infection or allergic reaction such as pus, severe pain, or fever, you should seek medical attention immediately.
Q: How do I choose the best brow shape for my face shape and skin tone?
A: The best brow shape for your face shape and skin tone is one that balances and harmonises your features. Generally speaking, round faces look good with arched brows that add some definition and angle. Square faces look good with soft curved brows that soften the jawline. Oval faces look good with straight or slightly arched brows that follow the natural bone structure. Heart-shaped faces look good with low-arched brows that create a natural heart shape. Diamond-shaped faces look good with curved or rounded brows that soften the cheekbones. As for skin tone, you should choose a brow color that is one or two shades darker than your hair color if you have light hair, or one or two shades lighter than your hair color if you have dark hair.

Have an Article to Suggest?
Tropika Club is always looking for new and exciting content to feature in their magazine and they value the input of our readers. If you have any noteworthy content or articles that you believe would be a great addition to Tropika Club’s magazine, we are open to suggestions and encourage you to reach out to us via email at [email protected]. By doing so, Tropika Club values your expertise and knowledge in the matter and appreciates your willingness to help. We will review your recommendations and update our list accordingly
Meanwhile, Check Out Tropika Club’s Ecosystem of Websites


Tropika Club Magazine – Tropika Club Magazine is a Singapore-based publication that features articles on a wide range of topics with a focus on local businesses and content for the region. The magazine emphasizes supporting local businesses through its #SupportLocal initiative, which includes coverage of everything from neighborhood hawker stalls to aesthetic clinics in town. In addition to highlighting local businesses, Tropika Club Magazine also covers a variety of local content, including beauty, lifestyle, places, eats, and what’s on in Singapore and the Asia Pacific region.
Tropika Club Deals – Tropika Club Deals is a leading online deals and voucher shopping site in Singapore, offering amazing discounts on beauty, wellness, and fitness products and services. It’s the perfect platform for customers who want to discover the best deals without having to commit to a specific appointment date and time. These deals are available at major beauty stores, facial salons, hair salons, and other brands in Singapore, with no minimum spend required. Choose from guaranteed discounted deals in the categories of hairstyling, hair removal, facial & aesthetics, body slimming, brows & lashes, nails & makeup, massage & spa or fitness & wellness. Tropika Club Deals is also ideal for customers who want to buy vouchers as gifts or to use for the future. So whether you’re looking to save money on your next haircut or want to treat yourself to a relaxing massage, Tropika Club Deals has got you covered with the best voucher and coupon deals in Singapore!