
How to Easily Take a Screenshot of What is on Your Computer Screen
The capacity to take a screenshot (a.k.a. screen capture or screen grab) of your desktop or an application window opens a ton of entryways for simpler sharing: from posting pictures or explicit segments of article message via web-based networking media to sending messages to technical support to show an issue you’re encountering. Let Tropika Club share with you the way to take a screenshot on Windows and Mac.
Table of Contents
- No Time to Read? Here’s a Snappy Summary of This Article
- Take a screenshot on Windows
- Utilising the Snipping Tool
- To utilise the Snipping Tool:
- Take a screen capture on Mac OS X
- Using the Screenshot device
- FAQ FOR HOW TO EASILY TAKE A SCREENSHOT OF WHAT IS ON YOUR COMPUTER SCREEN
- Meanwhile, Check Out Tropika Club’s Ecosystem of Websites
No Time to Read? Here’s a Snappy Summary of This Article
- How to take a screenshot on Windows: Press the PrtScn key to capture the whole screen, or use the Snipping Tool or Snip & Sketch apps to select a specific area. Paste the screenshot into an image editor or save it as a file.
- How to take a screenshot on Mac: Press Shift-Command-3 to capture the whole screen, or Shift-Command-4 to select a specific area. The screenshot will be saved as a file on the desktop or in a folder of your choice.
- How to take a screenshot on iPhone: Press the Side button and the Volume Up button at the same time, or enable AssistiveTouch and tap the screenshot button. The screenshot will be saved in the Photos app or in a folder of your choice.
- How to take a screenshot on Android: Press and hold the Power button and the Volume Down button at the same time, or swipe your palm across the screen if your device supports it. The screenshot will be saved in the Gallery app or in a folder of your choice.

Take a screenshot on Windows
Search for the Print Screen key on your console, which may be named PrtScn or some comparable variety.
- To catch the whole screen (all that you see on the screen, including every open window), press the PrtScn button. This screenshot will be set in your clipboard.
- On the other hand, to catch only the dynamic or premier window, press Alt+PrtScn. (A few devices may expect you to tap Fn simultaneously.)
- On the chance that you need to choose a segment of your screen to get, hit Windows+Shift+S. In Windows 10, this will open the Snipping Tool, which we’ll clarify beneath.
Next, open a word processing or picture altering program like Microsoft Paint and either go to Edit > Paste or hit Ctrl+V to paste the picture into the program.
Go to File > Save As and save the picture to a file so you can utilize it later.

Utilising the Snipping Tool
Windows 7, 8.1, and 10 accompany the Snipping Tool. With the Snipping Tool, you can characterise regions of the screen to catch (an unpredictable shape, square shape that you draw, a chosen window, or the whole screen), explain the screen catch, and offer using email.
Since you can save the picture legitimately from the program, the Snipping Tool likewise saves you the progression of opening Paint or an alternate program and pasting the picture from the clipboard. Press the Save Snip button after you take your screenshot.
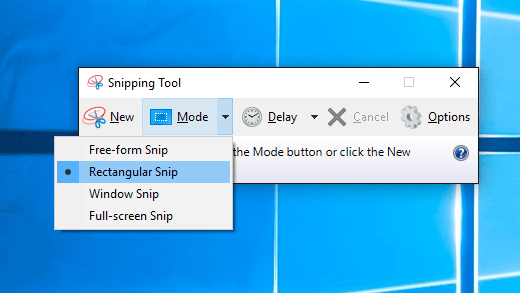
To utilise the Snipping Tool:
- Press Start, at that point type “snipping tool” into the search box. Select the Snipping Tool from the outcomes.
- Press Mode to choose the sort of screenshots you need to take. At that point utilize your mouse to choose the region of your screen or window you need to catch.
- You can likewise utilize the Snipping Tool to catch a menu alternative, for example, a drop-down that regularly vanishes when your mouse button is discharged or the Start menu. Press Ctrl+PrtScn to catch the menu. In case you’re in Windows 7, press ESC before opening the menu you need to snap.
- To draw over or feature portions of the screenshot, click the pen or highlighter fastens on the menu.
When you have your screenshot you can save it, email it, or duplicate it for pasting into another application by using the Save Snip or Send Snip choices.
Take a screen capture on Mac OS X
Macintosh OS X additionally has console easy routes for screen getting. After squeezing these key blends to take your screenshots, you’ll hear a tick, and the screenshot thumbnail will show up in the lower right corner of your screen.
- To catch the whole screen, press Cmd+Shift+3 simultaneously.
- To catch a selected zone of your screen, press Cmd+Shift+4. Your cursor will transform into a crosshair and you can haul around the region you need to catch.
- To catch a particular window or something like the Dock or menu bar, press Cmd+Shift+4 and following, hit the Spacebar. The crosshair will transform into a little camera and feature the window or articles you can catch.
- To catch what’s on your Touch Bar, press Cmd+Shift+6.
Screen captures are consequently spared as PNG records to your work area. If you need to save to the clipboard rather, press and hold Control while you snap to catch.
Using the Screenshot device
Macintosh OS X (Mojave and later) likewise has an apparatus for taking a screenshot called—obviously—Screenshot. You can get to it utilising Cmd+Shift+5 or under Applications > Utilities.
At the point when you open Screenshot, a skimming toolbar will show up at the base of your screen. You can choose whether you need to catch a choice, a particular window, or the whole screen.
You additionally have the choice to record your screen (the whole thing or a chose part) or set up a 5-or 10-second clock delay. The default setting saves your screenshots to Desktop; however, you can choose different goals under the Options menu.
Conclusion
Taking screenshots is a useful skill that can help you capture important information, share your work with others, or troubleshoot problems. Whether you use Windows, Mac, iPhone, or Android, there are simple ways to take screenshots of your entire screen or a specific area. You can also use various tools and apps to enhance your screenshots, such as adding annotations, cropping, or editing. In this article, we showed you how to easily take a screenshot of what is on your computer screen using different methods and devices. We hope you found this guide helpful and learned something new today. If you have any questions or feedback, feel free to leave a comment below. And don’t forget to check out our other articles on Tropika Club Magazine for more tips and tricks on how to make the most of your digital life. Thanks for reading!

FAQ FOR HOW TO EASILY TAKE A SCREENSHOT OF WHAT IS ON YOUR COMPUTER SCREEN
Q: How do I take a screenshot on a Chromebook?
A: To take a screenshot on a Chromebook, press Ctrl + Show Windows key (or Ctrl + F5). This will capture the entire screen and save it to your Downloads folder. To take a screenshot of a specific area, press Ctrl + Shift + Show Windows key (or Ctrl + Shift + F5), and then drag your cursor to select the area you want to capture.
Q: How do I take a screenshot on Linux?
A: To take a screenshot on Linux, you can use the built-in Screenshot app or various keyboard shortcuts. The Screenshot app lets you choose between capturing the whole screen, a window, or an area. You can also set a delay and other options. To launch the Screenshot app, press Alt + F2 and type gnome-screenshot. Alternatively, you can use these keyboard shortcuts:
- PrtScn: Capture the entire screen and save it to your Pictures folder.
- Alt + PrtScn: Capture the current window and save it to your Pictures folder.
- Shift + PrtScn: Capture a specific area and save it to your Pictures folder.
- Ctrl + PrtScn: Capture the entire screen and copy it to your clipboard.
- Ctrl + Alt + PrtScn: Capture the current window and copy it to your clipboard.
- Ctrl + Shift + PrtScn: Capture a specific area and copy it to your clipboard.
Q: How do I edit my screenshots?
A: To edit your screenshots, you can use various tools and apps that allow you to crop, resize, annotate, or enhance your images. Some of the popular tools and apps are:
- Paint: A simple image editor that comes with Windows. You can use it to crop, resize, rotate, draw, or add text to your screenshots. To open Paint, press Windows key + R and type mspaint.
- Snip & Sketch: A Windows app that lets you capture and annotate screenshots. You can use it to add shapes, colors, highlights, or notes to your screenshots. To open Snip & Sketch, press Windows key + Shift + S or click the Start menu and type Snip & Sketch.
- Preview: A Mac app that lets you view and edit images. You can use it to crop, resize, rotate, adjust colors, add shapes, text, or signatures to your screenshots. To open Preview, press Command + Space and type Preview.
- Photos: A Mac app that lets you organize and edit your photos. You can use it to crop, rotate, enhance, filter, or retouch your screenshots. To open Photos, press Command + Space and type Photos.
- Photoshop: A professional image editor that offers advanced features and tools for editing your screenshots. You can use it to crop, resize, rotate, adjust colors, add layers, effects, filters, or text to your screenshots. To open Photoshop, click the Start menu (Windows) or Launchpad (Mac) and type Photoshop.
Q: How do I share my screenshots?
A: To share your screenshots, you can use various methods depending on where you want to send them. Some of the common methods are:
- Email: You can attach your screenshots as files or paste them as images in your email messages. To attach a screenshot as a file, click the paperclip icon in your email app and browse for the screenshot file. To paste a screenshot as an image, copy the screenshot to your clipboard (using Print Screen or other keyboard shortcuts) and paste it in your email message (using Ctrl + V or Command + V).
- Social media: You can upload your screenshots as photos or paste them as images in your social media posts. To upload a screenshot as a photo, click the camera icon in your social media app and browse for the screenshot file. To paste a screenshot as an image, copy the screenshot to your clipboard (using Print Screen or other keyboard shortcuts) and paste it in your social media post (using Ctrl + V or Command + V).
- Cloud storage: You can save your screenshots to cloud storage services like Google Drive, Dropbox, OneDrive, or iCloud. This way, you can access them from any device or share them with others via links. To save a screenshot to cloud storage, drag and drop the screenshot file to the cloud storage folder on your computer or upload it using the cloud storage app or website.
Q: How do I take a screenshot of a video?
A: To take a screenshot of a video, you can use the same methods as taking a screenshot of a webpage. However, you may need to pause the video or use a delay option to capture the exact frame you want. Alternatively, you can use a video capture tool or app that lets you record your screen as a video and then extract frames as images. Some of the popular video capture tools and apps are:
- Game Bar: A Windows app that lets you record your screen as a video while playing games or using other apps. You can use it to capture your gameplay, tutorials, or presentations. To open Game Bar, press Windows key + G or click the Start menu and type Game Bar.
- QuickTime Player: A Mac app that lets you record your screen as a video or audio. You can use it to capture your screen activity, webcam, or microphone. To open QuickTime Player, press Command + Space and type QuickTime Player.
- VLC Media Player: A free and open-source media player that lets you play and record videos. You can use it to capture your screen as a video or audio, or to record videos from DVDs, webcams, or online streams. To open VLC Media Player, click the Start menu (Windows) or Launchpad (Mac) and type VLC Media Player.
Meanwhile, Check Out Tropika Club’s Ecosystem of Websites

Tropika Club Magazine – Tropika Club Magazine is a Singapore-based publication that features articles on a wide range of topics with a focus on local businesses and content for the region. The magazine emphasizes supporting local businesses through its #SupportLocal initiative, which includes coverage of everything from neighborhood hawker stalls to aesthetic clinics in town. In addition to highlighting local businesses, Tropika Club Magazine also covers a variety of local content, including beauty, lifestyle, places, eats, and what’s on in Singapore and the Asia Pacific region.
Tropika Club Deals – Tropika Club Deals is a leading online deals and voucher shopping site in Singapore, offering amazing discounts on beauty, wellness, and fitness products and services. It’s the perfect platform for customers who want to discover the best deals without having to commit to a specific appointment date and time. These deals are available at major beauty stores, facial salons, hair salons, and other brands in Singapore, with no minimum spend required. Choose from guaranteed discounted deals in the categories of hairstyling, hair removal, facial & aesthetics, body slimming, brows & lashes, nails & makeup, massage & spa or fitness & wellness. Tropika Club Deals is also ideal for customers who want to buy vouchers as gifts or to use for the future. So whether you’re looking to save money on your next haircut or want to treat yourself to a relaxing massage, Tropika Club Deals has got you covered with the best voucher and coupon deals in Singapore!